


Installing a dishwasher can feel intimidating—especially if you’ve never dealt with plumbing or electrical connections before. Many homeowners assume it’s a job strictly for professionals, while others jump in without fully understanding what’s involved. Both approaches can lead to frustration, wasted money, or even costly mistakes.
However, in practice, dishwasher installation isn’t always as complicated as it sounds.
If you’re still deciding whether installing a dishwasher makes sense for your home, this breakdown of whether a dishwasher is worth it walks through the real pros and cons for U.S. households.
Modern dishwashers are designed with standardized connections, clearances, and safety features that make installation far more approachable than it was years ago. In many homes, installing a dishwasher is a manageable DIY project—as long as you understand the requirements, follow the steps carefully, and know when professional help is the smarter option.
More importantly, a correct installation doesn’t just affect whether the dishwasher works. It directly impacts:
- cleaning performance
- drying results
- noise levels
- long-term reliability
A poorly installed dishwasher can leak, vibrate, drain incorrectly, or underperform—even if it’s a high-end model. As a result, knowing how to install a dishwasher the right way is just as important as choosing the right dishwasher in the first place.
This step-by-step guide walks you through the entire process—from deciding whether DIY installation makes sense, to preparing your space, to understanding plumbing and electrical requirements—so you can install your dishwasher safely, correctly, and with confidence.
Can You Install a Dishwasher Yourself?
Before picking up tools or unboxing a new appliance, the first question to answer is simple: should you install the dishwasher yourself at all?
The honest answer is: sometimes yes, sometimes no. The difference comes down to experience, home setup, and risk tolerance.
When DIY dishwasher installation is safe
DIY installation is usually reasonable if:
- you’re replacing an existing dishwasher
- the plumbing and electrical connections are already in place
- the cabinet opening meets standard dishwasher dimensions
- you’re comfortable using basic tools
In these cases, installation is often more about connecting and adjusting than building something from scratch. Water supply lines, drain hoses, and electrical connections typically follow standard layouts, especially in homes built or remodeled within the last 20–30 years.
For many homeowners, replacing an old dishwasher with a new one is a straightforward process that can be completed in a few hours with careful planning.
When you should hire a professional
On the other hand, professional installation is strongly recommended when:
- there has never been a dishwasher in the space before
- plumbing or electrical work needs to be added or modified
- local building codes require permits
- the home has older wiring or unconventional plumbing
In these scenarios, mistakes can be expensive. Incorrect electrical connections can pose safety hazards, and improper plumbing can lead to leaks that cause long-term damage to cabinets and flooring.
In other words, DIY saves money only when the setup already supports it. If major modifications are required, paying a licensed professional often costs less in the long run.
For renters or apartment dwellers who cannot make permanent changes, there are dishwasher options designed specifically to work without installation, which we cover in our guide to dishwashers for renters.
Building codes and permit considerations in the U.S.
Many homeowners overlook this step, but local building codes matter. Some municipalities require permits for new appliance installations, particularly if electrical circuits or plumbing lines are added.
While replacing an existing dishwasher rarely triggers permit requirements, installing one where none existed before often does. Because of this, it’s worth checking local regulations before starting—especially in older homes.
Understanding whether your project falls under “replacement” or “new installation” helps avoid fines and inspection issues later.
What You Need Before Installing a Dishwasher
Proper preparation is what separates a smooth installation from a stressful one. Before touching the dishwasher, it’s essential to confirm that your kitchen is ready.
Tools and materials checklist
Most dishwasher installations require only basic tools, but having everything ready in advance saves time and frustration.
Commonly needed items include:
- adjustable wrench
- screwdriver set
- plumber’s tape
- level
- flashlight
Depending on the setup, you may also need a new water supply line, drain hose, or electrical connector. Checking the manufacturer’s installation manual ahead of time prevents last-minute hardware store runs.
Plumbing requirements
Dishwashers need two plumbing connections:
- a hot water supply line
- a drain line
The water supply typically connects under the sink, either through a dedicated shutoff valve or a tee fitting. The drain hose must be routed properly to prevent backflow—usually through a high loop or air gap, depending on local code.
Incorrect drain setup is one of the most common installation mistakes and can lead to dirty water flowing back into the dishwasher.
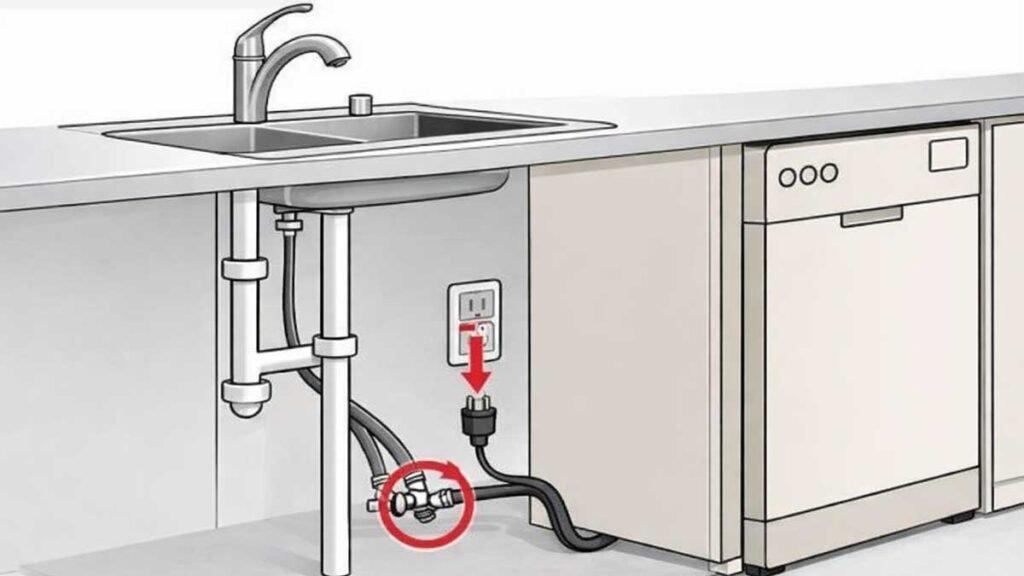
Electrical requirements
In the U.S., most dishwashers operate on a 120V grounded circuit. Some plug into a standard outlet, while others are hardwired.
Before installation, you should confirm:
- whether the dishwasher uses a plug or hardwired connection
- that the circuit is properly grounded
- that power can be shut off safely at the breaker
Skipping electrical safety checks is risky and should never be done.
Space, clearance, and cabinet preparation
Finally, the physical space matters more than many people expect. The cabinet opening must:
- match standard dishwasher dimensions
- allow clearance for hoses and wiring
- provide room for leveling adjustments
Even small mismatches can make sliding the dishwasher into place difficult or prevent the door from sealing correctly.
Proper measurement and prep at this stage prevent problems later—especially during final positioning.
Before moving forward, it’s important to confirm that your cabinet opening matches standard dishwasher sizes and dimensions to avoid fitment issues.
Step-by-Step Dishwasher Installation Guide
This is where preparation turns into action. If you want a better understanding of what happens inside the machine during a cycle, this beginner’s guide on how a dishwasher works explains the internal systems that installation directly affects.
The steps below follow the same sequence professional installers use, because order matters. Skipping ahead or changing the order often leads to leaks, electrical issues, or alignment problems later.
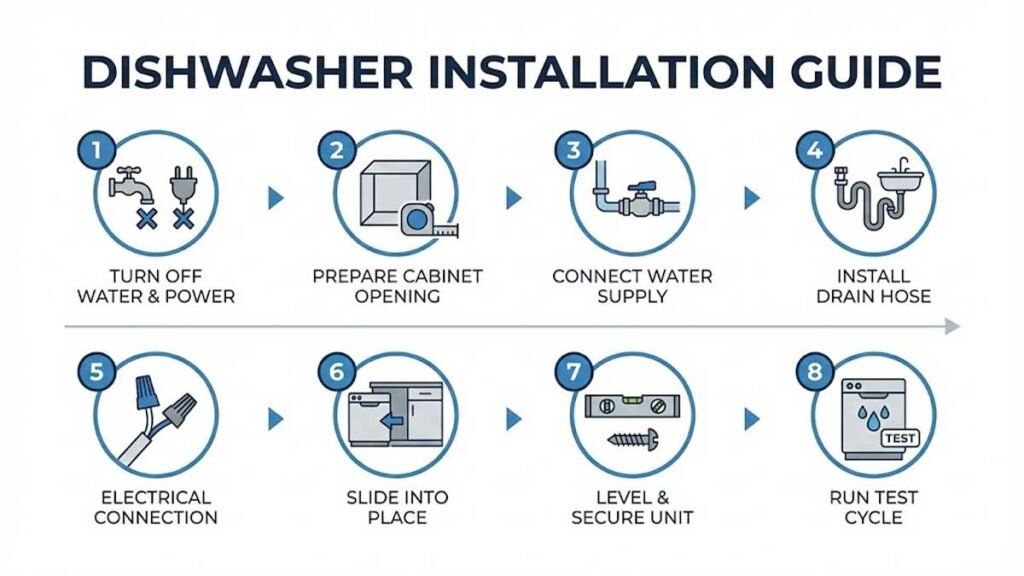
Step 1 – Turn Off Water and Power
Before touching the dishwasher or any connections, safety comes first. This step may seem obvious, but it’s also the one most often rushed.
Start by turning off:
- the hot water supply valve under the sink
- the electrical power at the breaker (not just the switch)
Even if the dishwasher plugs into an outlet, shut off the breaker. Dishwashers combine water and electricity in a confined space, and working with live power is never worth the risk.
Once both are off, open the cabinet under the sink and place a towel on the floor. Small amounts of residual water are normal when lines are disconnected later.
Why this matters:
Turning off both water and power prevents accidental flooding, electrical shock, and damage to the new appliance before it’s even installed.
Step 2 – Prepare the Cabinet Opening
With utilities safely off, the next step is making sure the space itself is ready.
Remove the old dishwasher if you’re replacing one, then inspect the opening carefully. You’re checking for three things:
- clearance
- routing paths for hoses and wiring
- obstructions that could prevent the unit from sliding in smoothly
Look for screws, brackets, or old mounting hardware left behind. These often interfere with proper alignment and can cause the dishwasher to sit crooked.
Next, locate the access holes for:
- the water supply line
- the drain hose
- the electrical cable
If the holes are too small or misaligned, now is the time to fix them—before the dishwasher is in place.
Pro tip:
Run your hand along the floor of the opening. Uneven surfaces or debris can affect leveling later and cause vibration during operation.
Step 3 – Connect the Water Supply Line
Once the opening is prepared, you can connect the hot water supply to the dishwasher.
Most dishwashers use a braided stainless steel supply line, which connects to the inlet valve at the bottom of the unit. Wrap plumber’s tape around the threads, then hand-tighten the fitting before finishing with a wrench. Tight is good—over-tight is not.
Route the other end of the supply line toward the shutoff valve under the sink, but don’t connect it yet if space is tight. Many installers prefer to make the final connection after the dishwasher is partially slid into place.
Important details to check:
- the supply line isn’t kinked
- the connection sits flush
- the hose has enough slack to allow positioning
Water line mistakes are one of the most common causes of slow leaks that go unnoticed for weeks. Take your time here.
Step 4 – Connect the Drain Hose Correctly
Drainage is where many DIY installations go wrong. A dishwasher can wash perfectly but still fail if the drain hose isn’t routed properly.
Attach the drain hose to the dishwasher’s outlet and secure it with a clamp. Then route it toward the sink drain or garbage disposal connection.
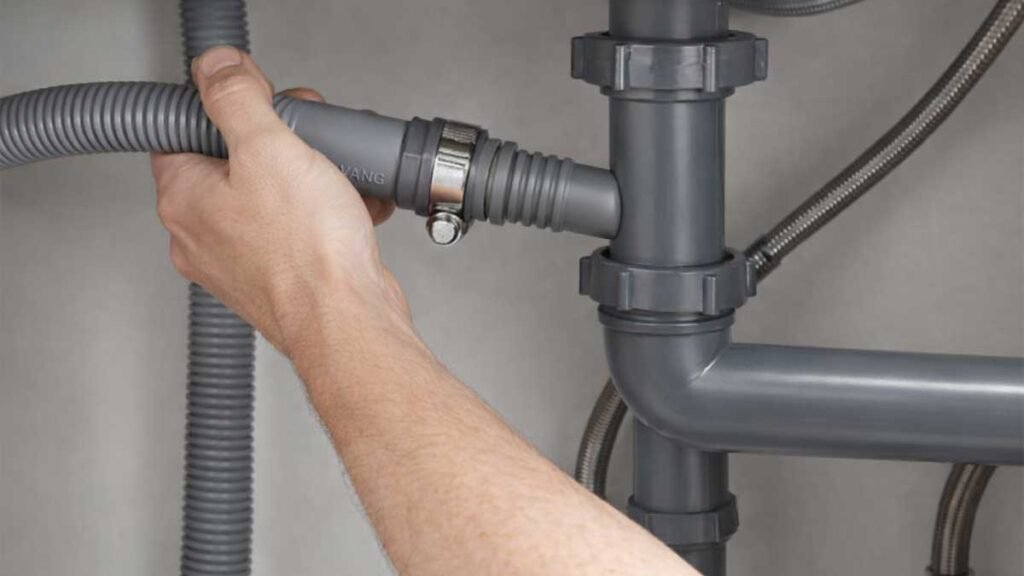
Here’s the critical part: the drain hose must form a high loop.
The hose should rise as high as possible under the countertop before dropping down to the drain connection. This prevents dirty sink water from flowing back into the dishwasher after a cycle.
In some areas, building codes require an air gap instead of a high loop. Check local requirements before finalizing the setup.
Why this step matters:
Improper drainage leads to standing water, odors, and poor cleaning results—issues that often get blamed on the dishwasher itself rather than the installation.
Step 5 – Electrical Connection Explained
With plumbing in place, it’s time to connect power. Dishwashers in the U.S. typically use one of two electrical setups: plug-in or hardwired. Knowing which one you have is critical before proceeding.
Plug-in models connect to a grounded 120V outlet, usually located in the adjacent cabinet. This is the simplest and safest option for DIY installers. Just make sure the outlet is:
- properly grounded
- protected by the correct breaker
- accessible without removing the dishwasher later
Hardwired models connect directly to the home’s electrical wiring through a junction box on the dishwasher. If you’re comfortable with basic wiring and local codes allow it, this can still be a DIY task—but precision matters.
When hardwiring:
- confirm the breaker is off
- connect black to black (hot), white to white (neutral), and green/bare to ground
- secure all connections with wire nuts and a strain relief clamp
Never leave loose wiring or exposed connections. Electrical issues here can cause intermittent power loss or trip breakers during cycles.
Step 6 – Slide the Dishwasher Into Place
This step looks simple, but it’s where many installations go wrong.
Carefully slide the dishwasher into the cabinet opening while guiding:
- the water supply line
- the drain hose
- the electrical cable
The goal is to avoid pinching or kinking anything behind the unit. Move slowly and stop if you feel resistance—forcing the dishwasher can damage hoses or wiring in seconds.
Once the unit is mostly in place, check alignment:
- the front should sit flush with the cabinets
- the door should open freely without rubbing
- the tub should be centered in the opening
At this stage, the dishwasher should still be movable. Final positioning comes after leveling.
Step 7 – Level and Secure the Dishwasher
Leveling is one of the most important—and most overlooked—steps in dishwasher installation.
Use a level to check:
- side-to-side balance
- front-to-back tilt
Adjust the leveling feet until the dishwasher sits perfectly level. A unit that’s even slightly tilted can:
- drain poorly
- vibrate during operation
- allow water to leak past door seals
Once leveled, secure the dishwasher to the cabinet or countertop using the manufacturer’s mounting brackets. This prevents movement during cycles and keeps the door aligned over time.
Pro tip:
Open and close the door once the unit is secured. It should feel smooth and solid, without resistance or wobble.
Step 8 – Test the Dishwasher for Leaks and Performance
Before calling the job done, testing is mandatory. This step confirms that every connection you made actually works under real conditions.
Start by turning the water supply back on slowly. Watch the water supply connection under the sink and the inlet valve on the dishwasher for any signs of moisture. Even a single drip matters.
Next, restore power at the breaker and run a short test cycle—preferably a quick or rinse cycle.
During the test:
- listen for unusual sounds
- check under the sink and behind the unit for leaks
- confirm that water drains completely at the end of the cycle
Open the door mid-cycle if needed and inspect the tub. Water should spray evenly, and there should be no pooling at the bottom once the cycle finishes.
If you see leaks:
Shut everything off immediately, tighten the connection, and retest. Small issues caught now prevent major damage later.
Common Dishwasher Installation Mistakes to Avoid
Even quality dishwashers can underperform when installation mistakes are made. These are the most common problems professionals see—and they’re all avoidable.
Many performance complaints are caused by setup and positioning issues rather than the dishwasher itself, which is also discussed in this guide on why a dishwasher doesn’t clean well.
Improper drain loop or missing air gap
A drain hose without a proper high loop allows dirty water to flow back into the dishwasher. This leads to odors, standing water, and poor cleaning.
Always route the hose as high as possible under the counter, or install an air gap if required by local code.
Loose or overtightened connections
Loose fittings cause slow leaks. Overtightened fittings damage threads and seals. The goal is secure—not forced.
Use plumber’s tape where specified and tighten fittings firmly but carefully.
Skipping leveling adjustments
A dishwasher that isn’t level can:
- vibrate loudly
- fail to drain fully
- leak at the door
Take the extra few minutes to get this right.
Forgetting the test cycle
Assuming everything is fine without testing is risky. Leaks often appear only when water pressure is applied during operation.
Dishwasher Installation for Special Situations
Not every kitchen follows the standard template. These scenarios require extra attention.
Installing a dishwasher in an older home
Older homes may have:
- outdated wiring
- limited grounding
- unconventional plumbing
In these cases, upgrading connections or hiring a professional is often the safest option. Electrical safety should never be compromised.
Replacing an existing dishwasher
Replacing a dishwasher is usually easier than installing one from scratch, but don’t assume old connections are still reliable.
Inspect:
- water supply lines
- drain hoses
- electrical wiring
Replacing worn components during installation prevents future failures.
Installing a dishwasher in apartments or rentals
Most rentals prohibit permanent installations. Renters should avoid built-in dishwashers unless explicitly approved by the landlord.
For rentals, consider temporary solutions designed specifically for apartment use.
How Long Does It Take to Install a Dishwasher?
Time depends on experience and setup.
- Replacing an existing dishwasher: 1–2 hours
- First-time installation (with prep): 3–4 hours
- Professional installation: usually under 2 hours
Unexpected issues—like tight spaces or incompatible fittings—can add time, so plan accordingly.
Cost to Install a Dishwasher (DIY vs Professional)
Understanding cost helps decide whether DIY makes sense.
If you’re installing a new unit rather than replacing an old one, our Best Dishwashers for 2026 buying guide can help you choose a model that fits your budget and kitchen setup.
Typical professional installation cost (U.S.)
- $150–$300 for basic replacement
- $300–$600+ if plumbing or electrical work is required
DIY installation costs
DIY costs are usually limited to:
- supply line
- drain hose
- electrical connector
In many cases, DIY installation costs under $50 in materials.
When paying a pro is worth it
If your setup requires:
- new electrical circuits
- plumbing modifications
- permits
Hiring a licensed professional is often cheaper—and safer—than fixing mistakes later.
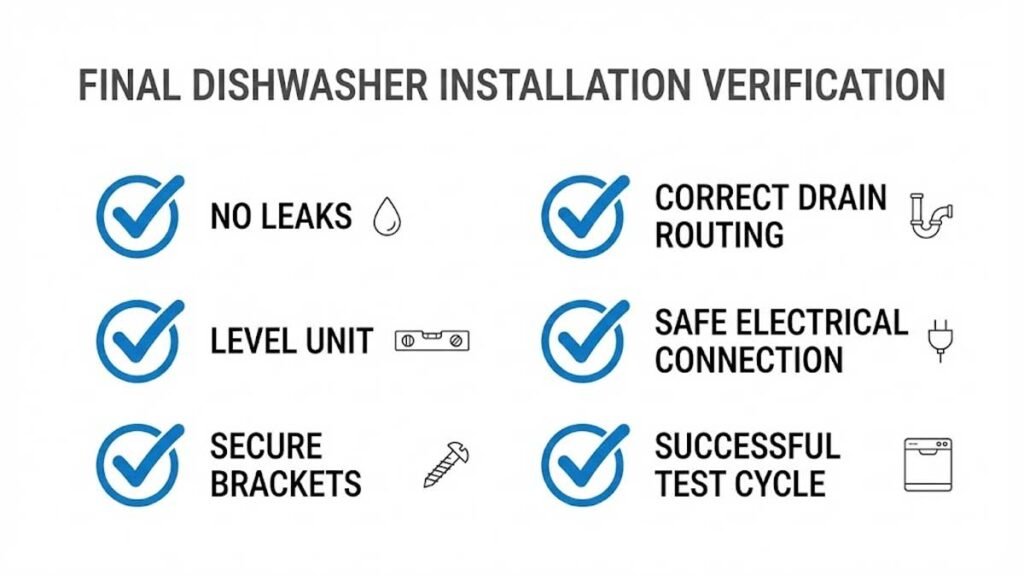
Final Checklist Before First Use
Before loading dishes and starting regular cycles, run through this quick checklist:
- ✅ Water supply is fully open
- ✅ No leaks under the sink or behind the unit
- ✅ Dishwasher is level and secured
- ✅ Electrical connections are safe and grounded
- ✅ Drain hose is routed correctly
- ✅ Test cycle completed successfully
If everything checks out, your dishwasher is ready for daily use.
FAQ — Dishwasher Installation
Q1: Can I install a dishwasher myself, or do I need a professional?
A: Many homeowners can install a dishwasher themselves when replacing an existing unit with compatible plumbing and electrical connections. However, if new wiring, plumbing changes, or permits are required, hiring a licensed professional is recommended.
Q2: Does a dishwasher need a dedicated electrical circuit?
A: Most U.S. dishwashers require a grounded 120V circuit. Some local codes require a dedicated circuit, especially for hardwired models. Always check the manufacturer’s instructions and local electrical codes before installation.
Q3: How long does it take to install a dishwasher?
A: Replacing an existing dishwasher typically takes 1–2 hours. First-time installations may take 3–4 hours, depending on cabinet preparation and connection access.
Q4: Do I need a permit to install a dishwasher?
A: Replacing an existing dishwasher usually does not require a permit. Installing a dishwasher where none existed before may require permits for plumbing or electrical work, depending on local regulations.
Q5: What is the most common dishwasher installation mistake?
A: The most common mistake is improper drain hose routing. Failing to create a high loop or install an air gap can cause backflow, odors, and poor cleaning performance.
Q6: How do I know if my dishwasher is installed correctly?
A: A properly installed dishwasher is level, secured in place, shows no leaks during a test cycle, drains completely, and operates quietly without vibration.
Final Thoughts
Installing a dishwasher doesn’t have to be intimidating. With proper preparation, attention to detail, and a methodical approach, many homeowners can complete the job successfully on their own.
That said, knowing your limits is just as important as knowing the steps. When in doubt—especially with electrical or plumbing changes—professional help is the smarter choice.
Beyond convenience, properly installed dishwashers often save water and energy compared to hand washing, as explained in this dishwasher vs hand washing comparison.
A correctly installed dishwasher runs quieter, cleans better, and lasts longer. And once it’s done right, you won’t have to think about installation again for years.

